 |
||
| > Reader's Photo OX5 by Lockheed Martin |
||
 |
||
| • ADVERTISE WITH US | ||
| • WHO IS MOAB JEEPER? | ||
|

Home > Jeep Articles > Technical & Installation - Suspension > Drop Pitman Arm Installation |
||||||||||||||||||||||||||||||||||
 |
||||||||||||||||||||||||||||||||||
|
Drop Pitman Arm InstallationArticle written by Cheaper JeeperDate Added: 06/15/2006 One of the common complications of lifting a Jeep is maintaining correct steering geometry. |
|
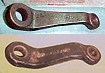
The Y-shaped tie rod arrangement on most Jeeps makes them increasingly susceptible to bump steer as the vehicle is lifted because the Y-shape "opens up" as the distance between the axle and steering box increases. Simply adjusting the steering linkages to compensate for the changes often isn't enough to correct the problem. One of the things we can do to remedy this situation is to install a drop pitman arm. The pitman arm is the arm that attaches the steering box output shaft to the draglink. Viewed from the side it is sort of step-shaped. The "drop" version means that the step is taller. This lowers the draglink, putting it down closer to its original position in relation to the axle. It is a simple job - but one that is NOT always easy. I purchased a TrailMaster brand drop pitman arm through an eBay auction. This arm lowers the draglink about 1/2". |
||||||||
|
Installation | |||||||||
1. The first step in removing the original pitman arm is to give both the draglink and steering box ends a good soaking with PB Blaster or your favorite penetrating oil. I recommend letting it sit overnight - or at the very least a couple of hours.  On an XJ, the front anti-sway bar passes directly under the nut that secures the pitman arm to the steering box shaft. This will need to be moved in order to remove the pitman arm. On an XJ, the front anti-sway bar passes directly under the nut that secures the pitman arm to the steering box shaft. This will need to be moved in order to remove the pitman arm. |
|||||||||
|
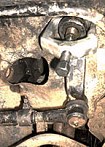
2. Once the penetrating oil has had a chance to do its job, loosen the nut that secures the draglink to the pitman arm. The nut can be very tight and/or rusted in place, so you want to do this while the arm is still mounted to the steering box. Leave the nut partially threaded on the tie rod end to protect the threads. |
|||||||||
|
3. Next remove the 1 1/4" nut that secures the pitman arm to the steering box shaft. |
||||||||
|
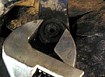
4. Separate the pitman arm from the steering box shaft with a good quality pitman arm puller. These can usually be rented from auto parts stores, but if you can't get one, a sturdy gear puller may be used. |
|||||||||
|
5. If the pitman arm doesn't come right off, here are a few trick to use. Use a hammer to tap the side of the pitman arm where it surrounds the shaft. You can apply heat to the pitman arm, but be careful to not damage the seals in the steering box. Finally if nothing else works, make relief cuts in the pitman arm and break it off with a chisel. Be very careful to not damage the steering box shaft. |
||||||||

|
6. Next use the puller to separate the pitman arm from the draglink. |
||||||||
|
7. Reinstallation is pretty much the reverse of removal. Put the new pitman arm onto the steering box shaft and reinstalled the lock washer and nut. |
|||||||||
|
8. Next, Reconnect the draglink to the pitman arm, securing it with the cotter pin. |
|||||||||
Final ThoughtsThe pitman arm nut should be torqued to spec. For my Cherokee it was 185 foot pounds. |
|||||||||
Purchase / Vendor Info
|
| Vendor Name: | Trail Master Suspension |
| Address: | 3651 N Highway 89 Chino Valley, AZ 86323 |
| Phone: | 928-636-3175 |
| Website: | http://www.trailmastersuspension.com/ |
