 |
||
| > Reader's Photo OX5 by Lockheed Martin |
||
 |
||
| • ADVERTISE WITH US | ||
| • WHO IS MOAB JEEPER? | ||
|

Home > Jeep Articles > Technical & Installation - Body Interior / Exterior > Off-Road Bumpers from TKH Fab & Repair |
||||||||||||||||||||||||||||||||||||||||||||||
 |
||||||||||||||||||||||||||||||||||||||||||||||
|
Off-Road Bumpers from TKH Fab & RepairArticle written by The DogDate Added: 06/05/2006 While wheeling in the rugged off-road area near the Ohio River called Wellsville, I witnessed a stock Jeep Wrangler bump up against a tree stump at less than 1 mph. The stock bumper folded over and twisted so badly, it had to be replaced. |

|
I knew right then that I needed to replace my stock bumpers. They weren?t going to be saving my Jeep from any type of body damage. So when a fellow Jeeper who was upgrading his rear bumper asked if I would be interested in his custom rear bumper, I jumped at the chance. It was my lucky day. I went to pick-up the bumper and immediately noticed that this was no ordinary bumper. It was a TKH Fab 56? Rear Bumper With 3/4" Shackle Points. I was so impressed with the bumper, I told my wife that if I could afford it, I would buy the TKH Fab 54? Single Hoop Front Bumper to match. On Christmas morning, I didn?t have too because Mrs. Claus delivered. These industrial strength bumpers are fabricated from ¼?x2?x5? steel tubing. The shackle points are fabricated and welded through the bumper for added strength. The rear bumper also has a sturdy 2? receiver. Both of these bumpers were very easy to install using most of the factory bolts, and they required only minor drilling. These bumpers will definitely out last your Jeep. You?ll be removing these bumpers to put on your next rig. |
|
Installation | |
|
1. 54? Single Hoop Front Bumper Installation Remove one ½? Diameter Torque Head Screw on the bottom side and two ½? Diameter Torque Head Screws on the top of each side of the front bumper. |
|
2. Remove tow hooks from each side. |
|
|
3. Slide the stock bumper forward and off of frame rails.  Clean frame rails before installation. Clean frame rails before installation. |
|
4. Check new bumper mounting tabs for burrs or other imperfections. |
|
5. Measure distance between tabs to assure fit onto the frame rails. |
|
|
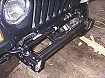
6. Slide bumper over frame rails, align bolt holes. |
|
|
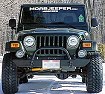
7. Replace tow hooks. I have Fog Lamp mounting plates under the tow hooks. |
|
8. Start all six - ½? Torx bolts. We recommend replacing the factory Torx bolts with grade 8 bolts. Torx heads are prone to rounding. |
|
|
9. Torque all six - ½? bolts to 80 Ft. lbs. |
|
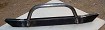
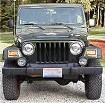
10. Here is the stock front bumper for comparison. |

|
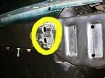
11. TKH Fab 56? Rear Bumper with 3/4" Shackle Points installaion The stock bumper has two 12 mm studs spot welded to the bumper and one 12 mm bolt and nut on the bottom on each side. Remove all six nuts to slide the stock bumper off. If your Jeep has a rear tow hook on the left side, you?ll need to remove the additional bolt and remove the hook. |
|
12. Temporarily mount new bumper. You?ll need eight 12mm x 60mm bolts. You will be able to reuse the two bottom stock bolts and nuts. You will need a total of ten bolts, but the rear stock bumper only had six bolts. Because of the receiver, you need to use more bolts. |
|
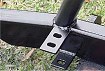
13. Mark the additional two holes on each side of the cross member. Remove the new bumper and center punch the four new bolt positions. |
|
14. Drill four ½? holes in the cross member. |
|
|
15. Remount the new bumper with all ten 12 mm bolts. |
|
|
16. Tighten all bolts to 57 ft. lbs. |
|
|
17. The space behind the cross member is tight because of the gas tank. I made a 3/8? x 2? x 2-1/2? tap plate for each side rather than remove the gas tank. The center between the two holes is 1-1/8?. I was able to slip the tap plates behind the cross member and tighten up the four new bolts. |
|
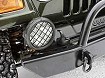
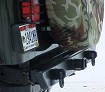
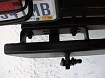
18. New rear bumper installed |
|
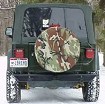
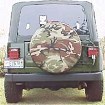
19. Looks much better than the stocker |
Final ThoughtsThese installations were very straight forward with minimal fabrication necessary. You?ll need to drill and tap four holes for the two tap plates for the 12 mm bolts. You will also need to drill 4 ? ½? holes in the cross member for the four additional bolts necessary for the full functionality of the receiver. That?s the extent of the difficulties of installations.I have had these bumpers for nearly two months. On a recent off-road adventure, I slipped off a river rock, cracking the rear bumper hard under the water?s surface. As I moved free from the river bed, I was wondering what damage I may have done to my rear end. After surveying the area of suspected damage, I was quite pleased to find only some scratched black bumper paint. A stock bumper would have surely been heavily damaged. I can?t find anything objectionable about these bumpers. I would recommend a healthy suspension system due to the shear weight of these fine bumpers. They are truly made for off-road protection, unlike many of the off-road bumpers on the market today. As other manufactures are trying to find ways to reduce the price of their products, TKH Fab has found a way to make their products with superior quality and strength at a great price. If you?re in the market for some new off-road bumpers, give TKH Fab and Repair a look. You won?t be disappointed. Who is T.K.H. FAB & REPAIR? TKH Fab & Repair is a family owned and operated fabricating shop located in Fayetteville, Ohio. They offer a large variety of fabrication services. Originally started fabricating for local businesses, today 95% of TKHFab?s business is tied to the off-road market. Their main goal is to make a solid and functional item for the customer like their ¼?x2?x5? tubing bumpers. |
