 |
||
| > Reader's Photo OX5 by Lockheed Martin |
||
 |
||
| • ADVERTISE WITH US | ||
| • WHO IS MOAB JEEPER? | ||
|

Home > Jeep Articles > Technical & Installation - Engine / Drivetrain > D30 U-Joint Replacement |
||||||||||||||||
 |
||||||||||||||||
|
D30 U-Joint ReplacementArticle written by Thomas BroermanDate Added: 09/22/2011 A friend of mine had a popping bang type sound coming from his 93 Yj front end. |
The sound was typical of a bad u-joint. He asked if I would help him change them. Grinning, I thought this would be the perfect excuse for the u-joint tool I wanted, another website addition, and anytime I can turn a wrench instead of housework is a plus. |
|
|
Installation | |
|
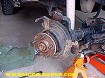
1. JACKED! First thing to do is lift the front end up on some jack stands and remove the front wheel followed by the brake caliper. (Click for picture) With the caliper off, the brake rotor will slide off the wheel studs. |
|
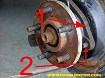
2. Getting to the U-joint For this next step a 12 point socket or wrench is required. Using anything other than a 12 point there is a good chance the 12 point bolt head will be stripped.
Remove the three bolts from the backside of the Bearing Carrier. In the picture to the left, 1 denotes the Bearing Carrier and 2 denotes the threaded end of the Bearing Carrier Bolt.
|
|
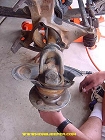
3. Before moving on to the next step. If you have a 36mm socket (recommend a six point socket) you can remove the center nut from the Bearing Carrier. This makes it a little easier to change the u-joint. However, if you do not have this large of a socket the job can be performed as outlined below. |
|
|
4. Removing the U-joint With the three Bearing Carrier Bolts removed the u-joint and axle will now slide out (picture left) of the axle tube. Remove the 4 clips from the u-joint. The clips are located on the inside of the yokes. After removing the C-clips the u-joints will have to be pounded out using a socket as a punch or press them out with a u-joint press tool. To install the u-joints back into the yokes, remove two of the u-joint caps (opposite of each other) and pass the shaft through the yoke ear and put the cap back on. Press or hammer the u-joint back through and put the other cap on. When the u-joint is centered between the two yoke ears both C-clips will go back on. C-clips must be put on with the open side of the C-clip towards the yoke because of a lip on the yoke. Repeat the procedure for the other yoke.
Re-assemble everything in reverse order. When sliding the axle back in rotate it to get the splines of the axle to line up inside the housing. If the axle is not lined up the assembly will not go back together correctly and could damage components.
|
Final ThoughtsThere it is, a U-joint replacement. Not a difficult job, but does take a little bit of work with the rust that tends to fuse these parts together. |

