 |
||
| > Reader's Photo OX5 by Lockheed Martin |
||
 |
||
| • ADVERTISE WITH US | ||
| • WHO IS MOAB JEEPER? | ||
|

Home > Jeep Articles > Technical & Installation - Body Interior / Exterior > T-Max EW9000 Competition Winch |
||||||||||||||||||||||||||||||||||||||||||||||||
 |
||||||||||||||||||||||||||||||||||||||||||||||||
|
T-Max EW9000 Competition WinchArticle written by Moab ManDate Added: 05/13/2007 As we assembled the line up of winches for our test there was no way we could pass up our mates from down under. With a brief chin wag, some tinny, and a hoo-roo we were on our way with a EW9000 Competition Winch from Oz. |
|
 What we just said?? we?re not really sure. However, we felt this winch test would be the perfect opportunity to introduce everyone to T-Max starting with our installation. What we just said?? we?re not really sure. However, we felt this winch test would be the perfect opportunity to introduce everyone to T-Max starting with our installation.
|
||||||
|
Installation | |||||||
|
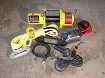
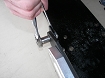
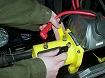
1. Install the solenoid mounting ?L? bracket to the bottom of the Integrated Control Box using the two included black allen screws and lock washers. These two allen screws replace the two already in the box. |
||||||
|
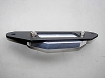
2. Attach the T-Max mini aluminum hawse to the fairlead adaptor plate.  Due to the compact size of the EW9000 Competition Series winch, the adaptor plate is necessary. Due to the compact size of the EW9000 Competition Series winch, the adaptor plate is necessary. |
||||||
|
3. Mount the adaptor plate with hawse fairlead to the winch plate. |
||||||
|
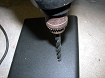
4. With the fairlead in place, center the EW9000?s drum so that it is behind the opening of the hawse fairlead. On a TJ place the winch far enough forward to not interfere with the swaybar that comes across the top of your Jeep?s frame rails. Precisely mark the footprint of the winch on the winch plate, and remove the winch. Taking careful measurements, mark the placement of the mounting bolts to pass through the winch plate.
This is the point we should mention... measure twice and cut (or drill) once.
|
||||||
|
5. With the holes drilled, attach the winch to the winch plate using the included 3/8?UNC 1-1/4? stainless steel bolts and nuts. |
||||||
|
6. Mount the entire winch and winch plate assembly to the vehicle per the winch plate manufacturer?s instructions. |
||||||

|
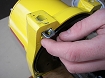
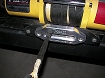
7. Attach the Integrated Control Box to the Winch Tie Bar as shown. Replace the existing bolt with the included silver allen bolt. |
||||||
|
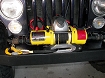
8. Match the color-coded cables from the Integrated Control Box to the terminals on the motor of the EW9000. |
||||||
|
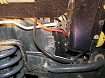
9. The black ground wire from the Integrated Control Box and the stand-alone black battery ground cable attach to the bolt on the bottom of the winch motor. |
||||||
|
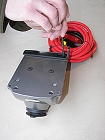
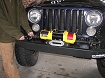
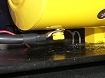
10. Route the red power cable and black ground cable through the grill, and connect them to your battery. We coiled the extra cable behind the grill in front of the radiator. |
||||||
|
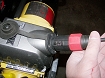
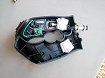
11. Insert the controller ?plug? into the Integrated Control Box. Line up the slot of the plug with the groove of the Integrated Control Box socket. Once the plug is slid in all the way, turn it to the right until you feel the internal latch click. This winch can be operated wireless or with a hardwire connection. If using wirelessly, precede step 13. |
||||||

|
12. Hardwire Operation: Connect the included controller cable to the plug and the wire lead on the handheld controller. |
||||||
|
13. Attach the synthetic rope to the drum (motor side), and spool the rope onto the winch. |
||||||
|
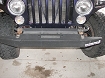
14. Installation is now complete, and the winch is ready for use. |
||||||
|
Installation Issues- The bolt that attaches the synthetic rope to the drum is too short and only extends 1-2 threads past the thick Master Pull rope?s crimp. We exchanged our bolt for something a little longer.- Sometimes the Integrated Control Box will continue to pull for .5 to 1 second after releasing the ?IN? toggle. This can be a little disconcerting when you do not have absolute control as the winch operator. - Due to the smaller footprint of this winch, we requested a winch plate from T-Max. The winch plate we received fits the winch but is too narrow to reach the frame rails of the Jeep. - The instructions for installing this winch appear to be a poor translation into English and lack in details. For example, in our steps 1 and 7, the T-Max instructions do not mention using the included hardware. A mild adjustment to the writing, and the added explanation for replacing bolts with the included hardware would greatly improve the instructions. - Opening up the controller to replace the battery, we found double sided sticky tape holding the battery in place and a wire that goes to nothing. We suggest removing this wire completely if it has no use and making a battery tray that will properly hold the battery in place. |
||||||
|
Final ThoughtsThis winch appeared to have a number of detail issues. If these little issues in our "Installation Issues" were addressed it would greatly improve the installation experience and add no additional cost to the product.As for the winch plate? We are not sure what it goes to. |
||||||
Purchase / Vendor Info
|
| Vendor Name: | 4 Wheel Parts |
| Address: | 1789 S Redwood Rd Salt Lake City, UT 84104 |
| Phone: | 801-627-4420 |
