 |
||
| > Reader's Photo OX5 by Lockheed Martin |
||
 |
||
| • ADVERTISE WITH US | ||
| • WHO IS MOAB JEEPER? | ||
|

Home > Jeep Articles > Technical & Installation - Body Interior / Exterior > Cluster's Last Stand |
||||||||||||||||||||||||||||||||||||||||||||||||||||||||||||||
 |
||||||||||||||||||||||||||||||||||||||||||||||||||||||||||||||
|
Cluster's Last StandArticle written by J Rations staffDate Added: 07/11/2007 Take your full-sized Jeep?s driver interface from ?worn-and-nasty? to ?stylishly sweet? in no time flat |
|
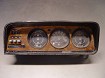
We?ve seen our share of ratty-looking instrument clusters peering out from under the dash pads of many Wagoneers, J-10s and the like. A sorry state for many, to be sure, but if you were exposed to wild swings of heat and cold, humidity, dust, bugs and general wear for several decades, you?d likely not be looking factory-fresh, either. If you have a big Jeep you?re nursing back to health and the instrument cluster is one of the projects on your list, we?re here to help. This refurbishing doesn?t take a lot of cash (assuming your instruments are in good shape), and the most difficult part of the operation is getting the cluster out of the dash to work on it. Once it?s on your workbench, it?s easy sailing. |
|
Installation | |
|
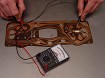
1. After you have the instrument cluster out of the dash, completely dismantling the unit is the first step to restoring it. The bulb sockets are removed by giving them a 90-degree twist and pull. |
|
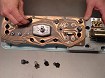
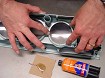
2. Remove the screws that secure the printed circuit and gauge assemblies to the back of the housing. When screwing and unscrewing on the housing, be careful; age and exposure to extreme temperatures can make the plastic components quite brittle. |

|
3. With the perimeter screws removed, the circuit and gauge assemblies are separated from the housing. |
|
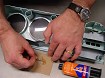
4. The lenses are secured to the housing by melted plastic pins. These tend to be fragile. If you need to remove the lenses for cleaning and polishing, you can carefully drill the melted pins with a small drill bit, then chip as necessary. Best to leave them in place if at all possible. One of ours had already broken free, so we?ll show you how to reinstall these if you choose to remove yours. |
|
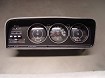
5. The temperature slide knob must be removed from its arm before the control switch assembly (blower motor switch and heat selector) can be removed from the housing. This knob is held in place by rows of barbs on either side of the arm. The only way to remove it is to pull the knob firmly while rocking it back and forth. |
|
6. With the slide knob removed, turn the housing over and remove the remaining control switch assembly attaching screws. |
|
7. The control switch assembly comes out of the housing without the need to remove the heat selector knobs. Good thing, too, because they are tough to pull off. |

|
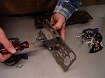
8. Now you can see how the heat selector control works. This is the time to make sure all the buttons are functioning properly, meaning that they are catching and releasing on the back plate, and they are rotating the vacuum control. |
|
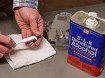
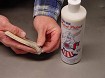
9. Denatured alcohol is a mild cleanser that can cut through grime without damaging finishes. Use this and a nylon brush (toothbrush works well) to clean the knobs. We pulled one off to better illustrate the process, but this isn?t necessary. |
|
10. As you can see, the denatured alcohol and a quick brushing did wonders to restore the shine. Compare this to the unclean knobs. |
|
11. If you really want to put the sparkle back into your bright parts, apply a buffing compound such as Magic Mix Metal Polish, available from The Eastwood Company, and buff. |
|
12. Q-Tips soaked in denatured alcohol work well to clean the grime from delicate, intricate and tough-to-reach spots. |
|
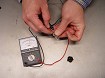
13. This is the ideal time to replace all of the bulbs in your instrument cluster (they pull right out of their plastic sockets). If you don?t want to spend the cash on them, at least check them for continuity. An ohmmeter will do just fine for this. |
|
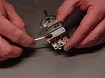
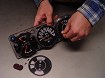
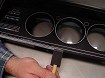
14. Small Torx screws secured the faceplates for our outboard gauges. We didn?t have a Torx driver small enough, but a tiny Allen wrench did the trick to remove them. |
|
15. Check all of the instruments for continuity at their positive and negative terminal posts. Replace as necessary. |
|
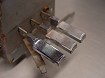
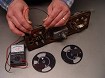
16. Two screws at the backing plate secure the speedometer. Remove these to complete the cluster disassembly. |
|
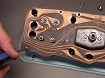
17. The printed circuit, or circuit board, should be gently cleaned with denatured alcohol, then each circuit tested for continuity. Place a probe at one end of a circuit, trace the circuit to its opposite end and touch with the other probe. It doesn?t pay to reinstall a circuit board if one of the circuits is damaged. |
|
18. Most of the clusters we?ve come across came with some form of woodgrain appliqué. If yours is in good shape and you like it, just clean it up and leave it. Ours had slipped over time and needed to be repositioned. After removing it, we decided that it would look better without it, so we left it off. |
|
19. Denatured alcohol, again, came to the rescue in removing the old adhesive from the housing. |
|
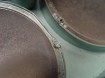
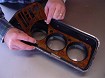
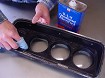
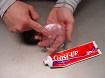
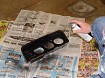
20. Here?s a 10-cent tip that works wonders on polished plastic. Our lenses were scuffed and hazy, and required a good polishing. Because the plastic is so easy to scratch, a super-mild abrasive is needed to polish the lenses. Close-Up gel toothpaste has just the right type and content of hydrated silica to remove light surface scratching and marring without making matters worse. Apply a dab of the gel to the lens, then swirl-polish with your clean fingers. Rinse, check and repeat as needed. |
|
21. Here you can clearly see the effectiveness of the toothpaste polishing trick. The left half is untouched, the right half was polished by fingers with Close-Up gel.
|
|
22. With the housing washed clean and dried, it?s time to repaint (assuming you?ve removed the appliqué). We found Dupli-Color Vinyl & Fabric paint in flat black at the local auto parts store. We weren?t sure how well it would work, but we applied one good coat, and it worked perfectly. The final texture was smooth and looked just like factory. (Before painting, make sure you mask off the lenses and all plastic light windows.) |

|
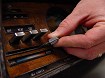
23. After giving the housing a new coat of flat black, it was time to fix the chrome accents we painted over (they were already worn off). For this we used Eastwood?s Almost Chrome spray paint (PN 103527). We made a little cup out of aluminum foil, sprayed the paint into it and then applied it to the narrower accent lines with a Q-Tip. |
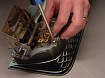
|
24. For the wider surround strip we used a small sponge brush to apply the Almost Chrome paint. Once dried, the trim wasn?t exactly chrome, but it...well...looked almost chrome, as the name implies. Good enough for our Jeep, anyway. |
|
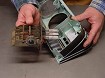
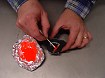
25. Next in need of a touch-up were the gauge needles. For this we purchased a can of fluorescent orange Plasti-Kote paint acquired from the local hardware store. Spraying a puddle into a makeshift aluminum foil container, we carefully applied the paint to all of the needles with a Q-Tip. |
|
26. Putting our dislodged lens back in place was our final fix for this cluster. To do this we used a Loctite epoxy gel, with separated resin and hardener. Squeezing out two equal amounts (by volume) and mixing resulted in an epoxy strong enough to hold the lens in place. |
|
27. Use a small finishing nail to carefully dab the epoxy around the lens bezel on the housing, then drop the lens in place, being careful not to move it before it set. Once the epoxy is cured, reassemble the cluster in the same order as you disassembled it. |
|
28. The final product. It?s not quite factory, but darn close to it, and will put this Jeep one step closer to looking like a respectable member of the classic Jeep family. |
