 |
||
| > Reader's Photo OX5 by Lockheed Martin |
||
 |
||
| • ADVERTISE WITH US | ||
| • WHO IS MOAB JEEPER? | ||
|

Home > Jeep Articles > Technical & Installation - Engine / Drivetrain > Installing West Texas Offroad?s Redneck Ram |
||||||||||||||||||||||||||||||||||||||||||||||||||||||||||||||||||||||||||||||||||||||||||
 |
||||||||||||||||||||||||||||||||||||||||||||||||||||||||||||||||||||||||||||||||||||||||||
|
Installing West Texas Offroad?s Redneck RamArticle written by Moab ManDate Added: 09/17/2007 We install West Texas Offroad?s Redneck Ram, and share an installation secret known only by the Gods! |

|
 That?s right during our recent installation of the Redneck Ram high pressure steering gearbox and pump, we (as mere mortals) were stopped cold by a simple fitting. So read on and see how simple this modification is, and discover the super-secret technique to removing the fitting. That?s right during our recent installation of the Redneck Ram high pressure steering gearbox and pump, we (as mere mortals) were stopped cold by a simple fitting. So read on and see how simple this modification is, and discover the super-secret technique to removing the fitting.
|
||||||||||||
|
Installation | |||||||||||||
|
1. Disconnect the swaybar from the axle, and unbolt it from the frame. Once unbolted set it to the side. |
||||||||||||
|
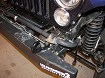
2. Unbolt the front bumper. 4 bolts topside & 2 below. |
||||||||||||
|
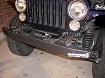
3. Remove steering box skid (if applicable). |
||||||||||||
|
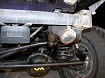
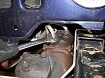
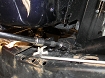
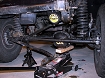
4. With the swaybar, bumper, and the steering box skid plate out of the way; you now have clear access to the steering box. |
||||||||||||
|
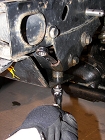
5. Using a ½? socket unbolt the steering shaft from the steering gearbox. Once the bolt is removed expect to wrestle the steering shaft back and forth while sliding it off the gearbox. |
||||||||||||
|
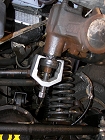
6. After removing the pitman arm nut, remove the arm with a pitman arm puller. |
||||||||||||
|
7. Notice the pitman arm is keyed to ensure proper installation. Before going any further we suggest getting a large oil catch pan and rags. Before going any further we suggest getting a large oil catch pan and rags. |
||||||||||||
|
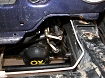
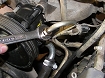
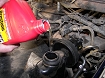
8. With the catch pan below the steering gearbox, disconnect the power steering lines from the gearbox with an 18mm wrench. |
||||||||||||
|
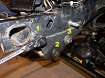
9. Detach the gearbox from the vehicle?s frame by removing the three frame bolts. |
||||||||||||
|
10. Now that we have the gearbox removed, we can move on to removing the pump. |
||||||||||||
|
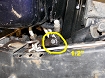
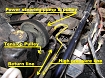
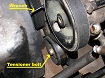
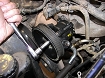
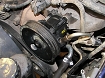
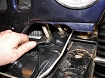
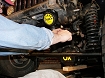
11. For those that may be unfamiliar, the power steering pump on Jeep?s 2.5L is located in the upper right (driver?s side) corner of the engine. Our picture shows all the key components for pump removal. |
||||||||||||

|
12. Disconnect the high pressure line from the pump, and push it to the side. |
||||||||||||
|
13. Loosen the Tension Pulley bolt, and back off the pressure on the serpentine belt. |
||||||||||||
|
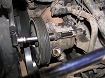
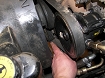
14. Passing an extension and socket through the holes on the pump pulley, remove the three bolts holding the pump to the engine. |
||||||||||||
|
15. After removing the three bolts, give the pump a bit of a push; and it will slide right out. |
||||||||||||
|
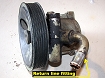
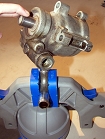
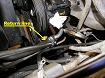
16. Here is the stock pump removed. A couple of the components need to be removed and transferred to the new pump. 1. The return line was removed from the return line fitting by loosening the band clamp and sliding it off. The hose can be reused, but we suggest replacing it since you have it off already. 2. The pulley must be removed from the pump using a special pulley removal tool. DO NOT try to use a standard gear puller to remove this. The pulley is aluminum, and you will destroy it. We made the trip to our local Autozone (or Checker) to get the right puller, and changed it over right there at the store counter.
3. Remove the ?return line fitting?, and transfer it to the new pump.
|
||||||||||||
|
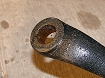
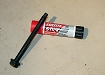
17. We decided to dedicate a whole step to removing this fitting. Why? It was the hardest part of the whole operation. This fitting is pressed into the pump at the factory by some machine that can apply forces greater than a black hole swallowing a planet. We tried everything known to man (twisting, heating, pulling, lubricating, etc?) trying to get this fitting out all the while fearing that we would damage the fitting rendering it unusable. A few parts stores weren?t even sure it could be removed, but they knew that we couldn?t simply buy a new one. Finally, after exhausting more than one hundred years of collective mechanic experience, we found the answer from a young kid at the local NAPA who we suspect was a God in disguise. The following is a partial reenactment of the monumental task: The kid clamped the fitting in a vice with rubber on either side to not damage the fitting. He then used a rubber mallet, and with more power behind it than Thor himself could have generated, he beat the hell out of the pump in an upward swing until it released the fitting. It may seem like we have over dramatized the removal of the fitting just a tad, but you can judge for yourself when it comes your time to remove it.
|
||||||||||||

|
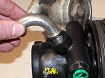
18. (Here is yet another step dedicated to this freak?n fitting.) When installing the return line fitting into the new pump, place the provided rubber o-ring onto the fitting and simply press it in. The insertion, unlike the removal, is easily done with the strength of a mere mortal. |
||||||||||||
|
19. After having our butts kicked and handed to us by the aforementioned fitting, we were now ready to install our pump. Apply Loc-tite to all the bolts. |
||||||||||||
|
20. Slide the new pump in to place, and install the three bolts |
||||||||||||
|
21. Connect the low-pressure return line. |
||||||||||||
|
22. Connect the high-pressure line. |
||||||||||||
|
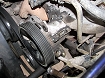
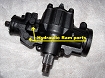
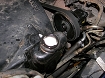
23. Here is the new pump installed. |
||||||||||||
|
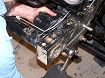
24. We are now ready to install the high pressure steering gearbox. Our box came equipped with optional ram ports for a future project. |
||||||||||||
|
25. Put the gearbox in place on the frame, and start the three bolts into it. Don?t torque the bolts yet. Don?t forget the Loc-tite. |
||||||||||||
|
26. Slide the steering shaft on to the gearbox noting that it is keyed to go on a specific way. Once the shaft is on, finish tightening both the gearbox to the frame rail and the steering shaft to the gearbox. Leaving the gearbox bolts loose makes it much easier to get the steering shaft started onto the gearbox. |
||||||||||||
|
27. Connect low and high pressure lines to the gearbox. |
||||||||||||
|
28. Reinstall the serpentine belt, and set it to the proper tension. |
||||||||||||
|
29. At this point lift the front of the Jeep and put it on jack stands. This is necessary for installing the pitman arm (remember it?s keyed) and filling/bleeding the power steering pump, reservoir, and gearbox. |
||||||||||||
|
30. When tightening down the pitman arm, don?t forget the large lock-washer. |
||||||||||||
|
31. At this point fill the reservoir and allow it to sit while fluid drains into the lines. Eventually the fluid level will settle, and you can move on to bleeding the system.
Leave the engine off and crank the steering wheel back and forth while slowly adding fluid as needed until you stop seeing bubbles. At this point the system is primed and ready to move on to the rest of the bleeding process. DO NOT start the engine until after this step is done. Once you start the Jeep, it will mix up ny air in the system whine or "cavitate" which is very bad for the pump. |
||||||||||||
|
32. Disconnect the distributor wire, and have your buddy crank the engine a couple of turns. Refill the fluid reservoir, and repeat three times. With the distributor reconnected and the reservoir filled, we are ready to start the engine. The tires should still be off the ground (step 29). Be prepared to add fluid as soon as the engine starts. It will suck the fluid out of the reservoir faster than you realize. In a short time the power steering fluid will foam. You will need to shut the engine off so that the air can dissipate, then repeat this step again. Eventually the fluid will settle down and stabilize, but you?re not done yet. This is the point your buddy needs to slowly turn the steering wheel fully left and right so that the air can be pushed out of the gearbox while you add more fluid.
This entire bleeding process requires patience. The air in the oil takes a while to settle out. Until it does the pump will continue to whine, and the reservoir will need additional fluid added. You will know when you?re done bleeding the system by the quieting of the pump? kind of. It took our Jeep about one week to chase all the air out of the system.
|
||||||||||||
|
Installation IssuesThere were no issues with the product. The only challenge was the return line fitting, but now that we have revealed the secret to removing it; your progress should go much easier than ours. |
||||||||||||
Final ThoughtsBesides the return line fitting kicking our rear ends, the entire install was a direct bolt-in as Matt, of West Texas Offroad, said it would be.Our initial impressions are that this is a mod we should have done a long time ago. The Jeep is much easier to drive around town and on the trail. The steering requires much less effort than before, but you don?t loose the feel of the road or any of the steering feedback. Be sure to check back here in a couple months for a full review after we?ve had some time to put it to a thorough test. |
|||||||||||||
Purchase / Vendor Info
|
| Vendor Name: | WEST TEXAS OFF ROAD |
| Address: | 6305 US Hwy 277 S. San Angelo, TX 76904 |
| Phone: | 1-87-STEERING (1-877-833-7464) |
| Contact Person: | West Texas Off Road |
| E-Mail Address: | |
| Website: | http://westtexasoffroad.homestead.com/index.html |
