 |
||
| > Reader's Photo OX5 by Lockheed Martin |
||
 |
||
| • ADVERTISE WITH US | ||
| • WHO IS MOAB JEEPER? | ||
|

Home > Jeep Articles > Technical & Installation - Suspension > Pro Comp Shock Relocators |
||||||||||||||||||||||||||||||||||||||||||||||
 |
||||||||||||||||||||||||||||||||||||||||||||||
|
Pro Comp Shock RelocatorsArticle written by Moab ManDate Added: 02/02/2008 Seldom are vehicles built with any concern for how the owner might try to alter them. However, I like to believe Jeep engineers are connected with all of us and understand that a good portion of Jeeps will be modified within the first year of ownership. |
|
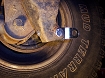
 In spite of Jeep engineers? better than average connection to the end user, sometimes they miss the boat. The rear shocks on TJs are exactly one of those ?missed the boat? examples. In spite of Jeep engineers? better than average connection to the end user, sometimes they miss the boat. The rear shocks on TJs are exactly one of those ?missed the boat? examples. Where am I going with this? Crawl under any lifted TJ that has suspension-flexing off-road time. If the shocks are mounted with the shock body at the axle, you will find the shock bodies have been dented by the coil-spring perch. Most of us are aware that TJ?s do this, but we dismiss it because off-road shocks are usually double walled (like that makes it okay). Well curiosity got the better of us, and we wanted to know if the shocks are in fact okay with this denting. As unscientific as it may be, we started unbolting TJ rear shocks and cycling them from full compression to full extension. Here is what we found?.
|
||||||||
|
Installation | |||||||||
|
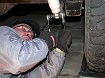
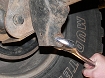
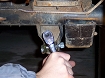
1. Unbolt the lower end of the shock, and remove the bolt. We?re covering just the install of the Pro Comp Shock Relocators. We recommend also replacing your shocks at this same time. We?re covering just the install of the Pro Comp Shock Relocators. We recommend also replacing your shocks at this same time. |
||||||||
|
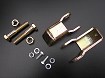
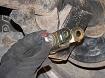
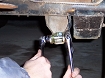
2. After removing the shock, or moving it to the side, test fit the Relocator. |
||||||||
|
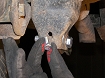
3. We found from the years of wheeling that the mounts were slightly tweaked and needed to be opened up a bit. This can be done relatively easily with a large Crescent wrench. Make little adjustments from different angles; otherwise you may kink or weaken the bracket. Make little adjustments from different angles; otherwise you may kink or weaken the bracket.
|
||||||||

|
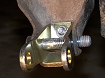
4. Does anything ever fit like it should? Maybe sometimes, but seldom on a Jeep. We found it necessary to ?customize? the shock relocator with a grinder to make it fit, in spite of having opened up the bracket. |
||||||||
|
5. Once the bracket has been customized enough, install just the bolt (grade 5 2.5? x .5?). Only the bolt is installed to leave the bracket loose for adjustments. |
||||||||
|
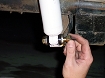
6. Install the 5/16? bolt through the shock mounting bracket and relocator bracket. |
||||||||
|
7. Place the lock washer on the 5/16? bolt. The lock washer is probably not needed, but with the shock installed you will not have access to this bolt; so it?s easier to just put it on now. |
||||||||
|
8. Tighten the 5/16? bolt / nut. |
||||||||
|
9. Tighten grade 5 2.5? x .5? bolt and nut. |
||||||||
|
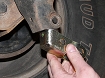
10. Here we have it all installed and ready for the shock. |
||||||||
|
11. Install (new) or re-install the shock. |
||||||||

|
Installation IssuesIn Step 4 we told you that we needed to use the grinder to customize the fit. Truth is we ?went to town? with the grinder. We shaved down the thickness of the bracket (both sides to keep it even), the face going into the shock mount, and some of the weld on the bracket.Our technique for not grinding down too much and ending up with a sloppy fit was crude but effective. First line up the bracket as it should go in. Use a baby sledge and carefully motivate the bracket as if it were going to fit. Once it?s pretty snug, as far as it will reasonable go, knock the bracket back out and take the grinder to all the places that rubbed on the factory shock mount. The rubs will be readily apparent. Now repeat until the bracket fits smoothly. When ?motivating? the bracket with the baby sledge, be careful not to misshape the bolt holes the shock attaches to. For those that don't own a grinder, a file could be used. However, it would be worth the money and time to get a hold of one. It would make for a really long day shaping this with a file. |
||||||||
Final ThoughtsThe slight change in position of the shock did nothing to change the way the Jeep rides or how efficiently the shocks work with the suspension geometry. What it did do for us was make our shocks last for longer than one axle articulation.Overall the fit could have been better, but this part is not TJ specific. If the factory made it narrower to fit our Jeep, it could be too small for other applications. |
|||||||||
Vendor ResponseGive us a call, and we will get some Pro Comp Shock Relocators mailed off right away.
Blake |
|||||||||
Purchase / Vendor Info
|
| Vendor Name: | All Pro Auto & Off Road |
| Address: | 1617 S. 1900 W. #1 West Haven, UT 84401 |
| Phone: | 801-731-6152 |
| Contact Person: | Blake |
 Our
Thank You's!
Our
Thank You's!
MOABJEEPER Magazine would like to thank All Pro Auto & Off Road for their continued support.
