 |
||
| > Reader's Photo OX5 by Lockheed Martin |
||
 |
||
| • ADVERTISE WITH US | ||
| • WHO IS MOAB JEEPER? | ||
|

Home > Jeep Articles > Technical & Installation - Body Interior / Exterior > Headlight Wiring Harness |
||||||||||||||||||||||||||||||||||||||||||||||||||||||||||||||||||||||||||||||||||||||||||||||||
 |
||||||||||||||||||||||||||||||||||||||||||||||||||||||||||||||||||||||||||||||||||||||||||||||||
|
Headlight Wiring HarnessArticle written by Dr. JonesDate Added: 07/12/2009 Putting high performance aftermarket headlights on your Jeep is a total waste? If you don?t first upgrade your headlight wiring. |
|
Most stock components on a vehicle are designed to a specific level of performance and nothing more. The factory headlights on a Jeep TJ are no exception. They do exactly what they were intended to do: They light up and allow you to see a little way down the road. We realized pretty quickly that the stock, yellowish, headlights simply weren?t going to cut it. But, we also wanted more with this Jeep than the usual Sylvania Silverstars upgrade could give us. Once we started shopping for aftermarket headlights, it readily became apparent that any quality aftermarket light would be a substantial improvement, but to fully realize their potential the worn out stock wiring would need to be addressed. Taking a voltmeter to our project vehicle, and a couple others, we found the power actually making it to the headlights (measured with the engine running and the headlights on) was about 12 volts on our TJ and as low as 9 volts on an older XJ. None of them actually showed us the full 14 volts we measured at the battery. So before we get into swapping in new bulbs, lets go through building the foundation for some really kick-butt headlights. |
||||||||
|
Installation | |||||||||
|
1. First things first. Take your time and do this right. Wiring is time consuming, so don?t expect to knock this out in 20 min. Take a couple hours, solder the connections, plan your routing, do it right, and you?ll have perfect working lights as long as you have your vehicle. However, rush this job and you will have the biggest self inflicted wiring head ache you can imagine. Not to mention the potential for an electrical fire. |
|||||||||
|
2. The basic idea of this harness is to power the headlights, through relays, directly from the battery - thereby eliminating the voltage drop caused by the stock wiring. The factory headlight wiring will now solely do the job of switching the headlights on and off and between high and low beams.
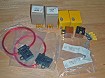
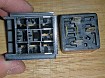
We are using a headlight wiring harness kit from Daniel Stern Lighting. You can purchase all the parts yourself, but the kit is a nice easy way to make sure you have everything (does not include wire).
|
|||||||||
|
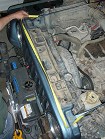
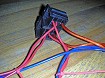
3. Start by deciding where you want the headlight relays. Under the hood right above the passenger headlight looked like a good spot. |
||||||||
|
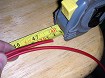
4. Measure the distance to the battery. |
||||||||
|
5. And the distance from the relays to each light. Be sure to measure a little extra so your wires don?t come up short. Be sure to measure a little extra so your wires don?t come up short. |
||||||||
|
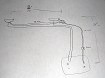
6. Next we drew a rough sketch of the layout to get an idea of how many wires we were going to need. |
||||||||
|
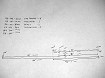
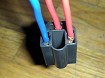
7. Then we made a parts list of wires we were going to need and their appropriate lengths. We have 12 awg red wires running from the + battery terminal to the relays and from the relays to the high and low beams on the headlights.
12 awg blue wires going from the headlight ground to the ? battery terminal
Not shown on the list, we also used some 18 awg yellow wire to switch on and off the relays.
|
||||||||
|
8. Now it?s time to run down to the parts store and pick up some GOOD wire. We opted for 12awg wire with the idea of running very high wattage bulbs off road. |
||||||||
|
9. Measure and cut your wires to length according to the nifty diagram you made in step 6 and 7. |
||||||||
|
10. Cut the wire loop on the fuse holders in about the middle. |
||||||||
|
11. Open the bag of supplied relay connectors and separate them. |
||||||||
|
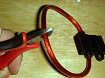
12. Strip the end of one of the wires on the fuse holders, and attach a relay connector. These connectors crip onto the wire, but going back to the do-this-job-right principle, we also soldered the connectors. |
||||||||
|
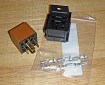
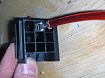
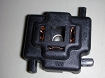
13. Look at the relay and socket carefully. You want the fuse to plug into pin 30 on the relay. |
||||||||
|
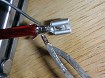
14. Be sure to clip the connector into the right hole. You can remove them if you mess up (we know), but it?s a pain (we also know). |
||||||||
|
15. Press the connector into the socket until it locks into place. |
||||||||

|
16. Repeat with the other fuse holder and relay socket. |
||||||||
|
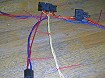
17. Solder relay connectors onto one end of each of the power wires that will be going from the relays to the headlights. There should be 4 total (2 for high beam, 2 for low beam).
|
||||||||
|
18. Snap those connectors into the relay sockets. Remember you are using one relay for low beams and the other relay for high beams. You want to connect the low beam wire from one light to one of the # 87 pins and the low beam wire from the other light to the other #87 pin on the same relay. Snap the connectors into the relay sockets and repeat for the high beams. |
||||||||
|
19. Here is where we vary from the supplied parts a bit ? by accident. Because there are no supplied instructions, we didn?t realize the white sockets are supposed to connect to the factory headlight sockets for switching the relays. Instead of using the white sockets, we just used some blade terminals we had lying around. We?ll continue the instructions based on what we did. |
||||||||

|
20. Take two of the yellow relay-switching wires and solder a blade terminal to one end of both of them. Also solder a relay connector to the other end. |
||||||||
|
21. Next take the other two wires, twist one end of each one together and connect one blade terminal to the two wires. Connect one relay connector to the other end of each wire (2 relay connectors, one blade terminal) |
||||||||
|
22. The two relay connectors on the wire you just made will connect to pin 85 on both relays. The other two yellow wires will connect to pin 86; one on each relay. |
||||||||
|
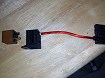
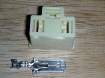
23. Again we?re going to stray from the provided parts, but this time on purpose. Daniel provided headlight sockets with spring loaded connectors. He assured us that he has been using these for years with no problems. On a Jeep that sees pretty harsh conditions, though, we opted for a set of headlight sockets with connections we could solder.
Daniel will provide whatever type of socket you specify when you order. |
||||||||
|
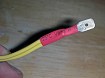
24. Solder the headlight socket connectors onto the ends of the wires coming from the relays. |
||||||||
|
25. And clip them into the headlight socket. Low beam on top, high beam on the right. |
||||||||
|
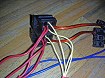
26. Zip tie the wires together and take a step back to see if everything looks right. |
||||||||

|
27. If you mount your relays the same place we did, you?ll need a couple lengths of wire to go from the fuse holders to the battery. |
||||||||
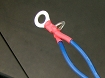
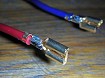
|
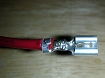
28. Connect the supplied ring terminals to the two positive and two negative wires that will be going to the battery. |
||||||||
|
29. The assembled harness is now ready to install in the Jeep. Start by mounting the relays. We drilled a small pilot hole and used a couple sheet metal screws. |
||||||||
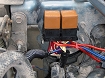
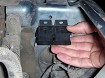
|
30. Here are the relays mounted in place. |
||||||||

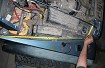
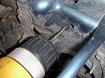
|
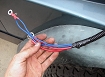
31. We ran the wires to the driver side headlight next to another loom of wires behind the grill. |
||||||||
|
32. Another shot of the wire routing |
||||||||

|
33. Plug the headlight sockets onto the headlights. |
||||||||
|
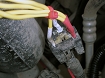
34. Connect the yellow wires to the factory headlight socket. We used the passenger side headlight socket because it was closer to the relays. |
||||||||
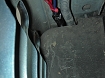
|
35. Here are the wires that connect to the battery. Use split loom on all the exposed wire runs under the hood. This is easier to do as you?re putting the harness in the Jeep so you know the exact lengths needed. |
||||||||
|
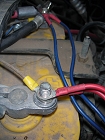
36. Connect the wires to the battery. The two red wires go to the positive terminal, and the two blue wires to the negative terminal. These battery terminals with the post and wing nuts are awesome for wiring accessories like this. |
||||||||
|
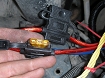
37. Plug the fuses into the fuse holders. |
||||||||
|
38. Turn on the headlights and make sure the high and low beams switch correctly and that both headlights are the same (both high or both low, not one of each) |
||||||||
Installation IssuesThe only installation issue we ran into was totally our fault. The headlight socket wouldn?t fit through the tight area around the driver?s side headlight mount. We had to remove the socket, run the wires and connectors through there, and reattach the socket. If you follow the same wire routing as we did, don?t attach the driver?s side socket to the harness until the wires are run. |
|||||||||
Final ThoughtsSo after all that, did we get the voltage increase we were looking for? Yes we did. Measuring the same way on our TJ that we did at the beginning of the article, we were now getting the full 14 volts at the headlights. Even without swapping in aftermarket bulbs, the extra 2 volts made a noticeable difference in light output with our crappy stock bulbs. Now that we have a proper wire foundation, let?s move onto taking full advantage of that with some high performance aftermarket lights. Stay tuned. |
|||||||||
Purchase / Vendor Info
|
| Vendor Name: | Daniel Stern Lighting |
| Contact Person: | Daniel Stern |
| E-Mail Address: | |
| Website: | http://www.danielsternlighting.com |
