 |
||
| > Reader's Photo OX5 by Lockheed Martin |
||
 |
||
| • ADVERTISE WITH US | ||
| • WHO IS MOAB JEEPER? | ||
|

Home > Jeep Articles > Technical & Installation - Body Interior / Exterior > Mountain Off-Road Enterprises (M.O.R.E.) Bolt-In Sport Cage |
||||||||||||||||||||||||||||||||||||||||||
 |
||||||||||||||||||||||||||||||||||||||||||
|
Mountain Off-Road Enterprises (M.O.R.E.) Bolt-In Sport CageArticle written by TrollDate Added: 03/06/2010 The Troll often wondered what it would feel like to experience a high speed full roll in a Jeep. At EJS 2009, his wish came true with a Mountain Off-Road Enterprises sport cage installed for the ride. |
|
 When the Hammer shot into the sky like the space shuttle only to come crashing down in a heap of twisted sheet metal and shattered glass, the Troll found himself in for the ride of his life. Inside all this carnage, the Troll?s noggin was intact and his M.O.R.E. cage held up like a champ. When the Hammer shot into the sky like the space shuttle only to come crashing down in a heap of twisted sheet metal and shattered glass, the Troll found himself in for the ride of his life. Inside all this carnage, the Troll?s noggin was intact and his M.O.R.E. cage held up like a champ.
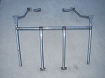
The ironic part about the roll is it was nearly identical to Rico Suave's Barney roll two years earlier at EJS 2007. Barney's bikini top was on the Hammer when the roll happened. This bikini top had been retired since that fateful day when Barney lost his footing and hurt his pride. The very first day out of retirement, this bikini top's curse came full circle in its attempt to kill the Hammer and the Troll. In effigy, the MoabJeeper staff decided to burn the bikini top as a sacrifice to the Moab gods. Now, onto the install. Packaged in the M.O.R.E. kit were all the parts we needed to install the Sport Cage, including: unpainted, pre-bent bars cut and bent for our TJ; all hardware for installation; and detailed instructions. |
||||||||||
|
Installation | |||||||||||
|
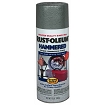
1. The first item of business for the installation is to paint the cage. For this, we chose Rust-Oleum?s Hammered Enamel Spray for its unique finish and good durability. Several uniform coats to the metal over the course of a few days should be applied to ensure a perfectly bonded finish. |
||||||||||
|
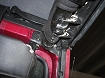
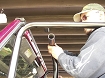
2. Remove the factory spreader bars going from the rear hoop to the windshield. This step requires a Torx-50 bit to remove the bolts from the windshield and hoop. |
||||||||||
|
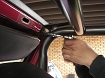
3. Remove the lowermost bolt on the top part of your windshield hinges to allow the top of the windshield to move forward to provide enough clearance for the new M.O.R.E. hoops. |
||||||||||
|
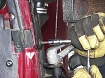
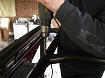
4. Install the main M.O.R.E. hoops by attaching them to the factory inserts on the main rear hoop with the bottom portions of the hoops going into your factory drain plug holes (the drain plugs need to be removed). NOTE: We experienced difficulty while attempting to insert the factory mounts into the new M.O.R.E. tubes and had to grind some metal off the mounts for insertion. |
||||||||||
|
5. Our installation included the optional spreader bars from M.O.R.E. If you order these for your kit, install them now by sliding them onto the main cross member.  Be sure to double-check the measurements of the cross members to make sure they are well centered on the main cross member. We left about 11 inches of space between the spreader bars to give the cage what looked to be the best stability and to ensure enough room for a CB radio to be installed between the bars. Be sure to double-check the measurements of the cross members to make sure they are well centered on the main cross member. We left about 11 inches of space between the spreader bars to give the cage what looked to be the best stability and to ensure enough room for a CB radio to be installed between the bars. |
||||||||||
|
6. Place each end of the main cross member onto the M.O.R.E. hoop mounts. |
||||||||||
|
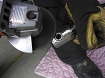
7. Attach the windshield brackets to the factory spreader bar mounting locations using the factory Torx-50 bolts you removed in step 2. |
||||||||||
|
8. Drill holes in the main factory hoop as well as the M.O.R.E. main cross member to attach the spreader bars to the factory hoop and cross member. This step only applies if you ordered the optional spreader bars. |
||||||||||

|
9. Touch up any paint scratches with your rattle can to give your cage the best finish possible. |
||||||||||
|
Installation IssuesWe ran into a couple minor issues while installing the M.O.R.E. cage in or TJ. First, there was the issue we mentioned with the factory spreader bar mounts not fitting properly inside the M.O.R.E. main hoops. We could not tell for sure if this issue was caused by either our layered paint bleeding inside the hoops making for a tight fit, or by small metal burrs inside the hoops. The fix was pretty simple with a few minutes spent with a hand grinder removing excess paint and metal from the mounts to ensure a good fit inside the hoops.Our second installation issue dealt with removing and re-installing one of the factory Torx bolts on the main hoop?s spreader bar mount. The bolt was so tight we had to use vice grips to remove it from the factory hoop. Several good doses of PB Blaster during the days before the cage installation would be a good idea to avoid this issue. |
||||||||||
|
Final ThoughtsWithout a doubt, the Mountain Off-Road Enterprises (M.O.R.E.) Sport Cage is a top value for the money spent. While it is not marketed as a ?roll cage? by the manufacturer, it served its purpose in 2 separate rolls with our Magazine staff members careening down the rocks of Moab and it saved our butts each time.We?ve product tested the M.O.R.E. Sport Cage to its fullest extent on 2 separate occasions and we are more than happy with the results we had with its performance when all was said and done. Our noggins are pleased too. |
||||||||||
Purchase / Vendor Info
|
| Vendor Name: | Mountain Off-Road Enterprises (M.O.R.E.) |
| Address: | 685 Hwy 92 Delta, CO 81416 |
| Phone: | 877-533-7229 |
| E-Mail Address: | |
| Website: | http://www.mountainoffroad.com |
 Our
Thank You's!
Our
Thank You's!
We would like to thank Mountain Off-Road Enterprises (M.O.R.E.) for supplying us with their Bolt-In Sport Cage for our Hammer TJ.
